Friday, June 21, 2013

Felt Initial Notebook Tutorial


This is a fun project to do with a group of children or adults with just a few supplies.

Here’s how it’s done…


You’ll need:

Notebooks
Wool Felt
Embroidery Floss
Stick Pins
Sharp Scissors
Glue Stick
Needle
Printed Initial


1.  Trace around your notebook on a piece of paper, cut it out and use it for your template.  I bought a package of 3 mini notebooks on a clearance pile for less than a dollar.

2.  For the initial I found a font that I liked online and printed out the letter.  Then I used the copier to enlarge it to the right size.  You could easily size it before printing if you prefer.

3.  Pin the notebook template and the initial to the wool felt and cut them out carefully.

4.  Line up your initial in the bottom corner of your template and attach it with two strands of matching embroidery floss and the stitch of your choice.


5.  Once you have completely attached the initial it’s time to glue your cover to your notebook.  I used a glue stick that came with my Smash Book but I’m sure most scrapbooking glue sticks will work.  I did test it first on an old notebook with a scrap of felt and it really stayed put!

Start at the front edge of the notebook and line up your cover.  Be sure to lightly glue the whole edge and attach with pressure.  Slowly add more glue and work your way all the way to the back of the notebook.  It will stretch slightly as you go but don’t worry.


6.  Once you are finished with the glue just trim around the whole notebook.  Then trim again to straighten the few uneven spots you’ll have left.  Sharp scissors make it easier!


Simple and Sweet!  These little notebooks are going to be gifts for some friends in Japan…handmade gifts rule, right?  I hope you will try some of these quick felt notebooks for yourself!


Please email me if you have any questions .

Tea Cup Pincushion


Hi everyone,
Today I have a gift for the seamstress on your Christmas list….that is easy and costs less than $5!  And the seamstress on your gift list will absolutely LOVE this tea cup pincushion and use it everyday!

{ Tea Cup Pincushion }

Here’s what you will need:
* A vintage tea cup
* A handful of stuffing
* A scrap of batting or felt
* A scap of fabric for the top of the pincushion
And here’s how you make it:


And ta-dah!  You have your gifts for all your sewers!
Thanks Jamielyn!  What a great round-up of all things Christmas….it has been amazing and I can’t wait for more!

Thursday, June 6, 2013

Woven Ankle Bracelet


This one is removable - mainly because of the cabochon I added.  While it will certainly stand up to a lot, making this a tie-on ankle bracelet is a lot of wear for spring and summer.  Being able to remove it for showers, swimming, wear under socks, etc. will certainly extend its life.
Like everything I show you – feel free to put your own spin on this design!  I’ll show you what I used and how I made it, but half the fun of DIY is coming to a design that’s all your own.  Let me show you how you can put one together for yourself!
This is a pretty quick project – 20-30 minutes.  You will need:


Hemp cord – cotton would work well too.  I used the small stuff, 10lb.
A bezel for your cabochon that has a link on each side.  I loved these ones from Consumer Crafts, but if you see something similar, give it a try!
A cabochon to fit your bezel – totally optional.
Glue-on end caps and jewelry glue.
First – attach cut off 6 strands of hemp about 12 inches long.  If you are running low on hemp, you could probably get away with making these as short as 10 inches, but having the extra length at the ends makes it much easier to work with.
Take 3 strands and double them, so you have 3 loops with 6 inch tails.


Now, you’re going to make a Lark’s Head knot  onto your bezel connector.  I talk about this a lot when I’m showing you jewelry made with hemp or twine.  You just feed your loop through one ring of the connector -


And feed the tails through your loops.


(It’s a two-handed job, I’m just showing you with one hand so I could show you a photo, haha.)  Now, tighten it up, and you’ll have a nice knot.  Do the same thing with your remaining three strands on the other side.


Now, you’ll want to braid these cords to create your bracelet.  If you love making six-stranded braids, they are lovely.  They aren’t as easy for me as three-stranded braids, though, so I take the faster route and braid a three-stranded braid with two cords in each strand.
The length you will need to braid will vary based on a couple things – the length of your center connector, and the length of your clasp.  For an ankle bracelet, you want a total length of 9-10 inches.  My connector is about and inch, and my clasp adds about an inch.  So that is 7-8 inches I need to braid – only 3 1/2 to 4 inches on each side.  At the end of each of those braids, make an overhand knot to close it off.


Now, you could leave this as a tie-on bracelet at this point if you prefer!  But I’m going to add a clasp so that it’s removable.
To do that, trim up your excess cords evenly.


Add a dot of glue on the inside of your end caps, and glue them onto each end of your bracelet.  Now, you will just need to attach a clasp!  I like the security of a lobster clasp, but use what you like.


Now, I just need to add my cabochon.  A bit more jewelry glue on my bezel connector, and I can add a little flower to dress it up!


There are so many different ways you could make one of these, this is just my design for the day. :) Hope you enjoyed it! I will have more jewelry coming up this week – and so do some other fabulous bloggers!  Be sure to check out the other blogs and get inspired!

Word Bracelets


For these, start with three strands of hemp about 16″ long for a bracelet-length.  You’ll want to go longer for an ankle-length bracelet – between 18″ and 20″.  You can also use cotton cord, it doesn’t have to be hemp – whatever you happen to have on-hand, or like the looks of.  You just want it to be fairly thin so that the beads will fit.
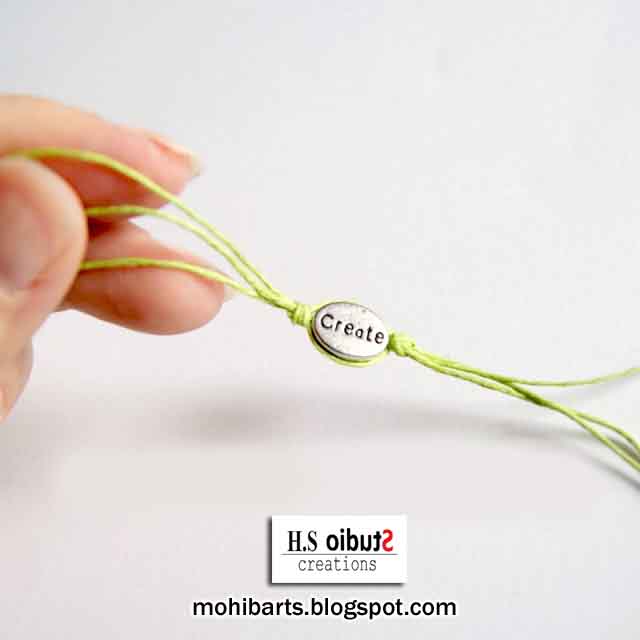
Tie a knot about 1/4″-1/2″ off center.  Thread your word bead onto the center strand.


With one thread going over the top, and one going under the bottom, carefully tie another knot on the other side of the bead.  Keep the threads as snug as you can.


I decided to braid each end to finish it off, but you could easily just be done here without the additional braiding, and tie them on loose.  That’s it – I told you this one was a simple idea.
What word would you choose?


Wish Bracelets 2.0 – Ankle Length


I love ankle bracelets, they are my permanent jewelry.  The only time I have ever taken mine off was late in my pregnancy when my ankles were too swollen.   In addition to the two silver ones I always wear, I usually make a special beaded ankle bracelet each summer to add some color.  Now that I have declared wish bracelets back in style (LOL, I tried, anyway) it’s about time I tie one on myself!
In case you missed the original tutorial, let me explain why they are called wish bracelets.  You make a wish, tie your bracelet on, and don’t take it off!  When the hemp eventually wears out, your wish is then released and it’s supposed to come true.  I don’t know that it ever really works, but since wishes are both free and fun… why not, right?
Speaking of wishes, I just love this funny.  (I had to do a quick edit, but I think it retains the point):


For an ankle length, start with three strands of hemp 18″ long.  Measure down 3″ and tie a knot.  Braid about 4″ to 4-1/2″.


Next, you’ll be braiding in a few beads.  I work from the right, but you can easily work from the left if you’re left-handed.  It doesn’t matter – you’ll just be braiding beads in from one side only.
Pull your right strand to the center of your braid.  Thread a bead onto this strand.


Snug it up close the braid, and pull the left strand to the center.


Now pull your right strand to the center, and thread another bead.


Continue, adding as many beads as you like.  I added five.  Then, braid the rest of your bracelet down another 4″ to 4-1/2″.  For an ankle length, you want a bracelet that ends up between 9″ and 10″.


Then, make them in every color, because you won’t be able to resist.


So, what are you making to wear this summer?

Vintage Inspired Resin Necklace


I found these cool oval bezels on a trip to Hobby Lobby, but this shape and size had no glass insert to fit it.  So I decided to get brave and buy some jeweler’s-grade, low-odor resin.  Now – don’t get me wrong, it’s not the kind of product you want your kids playing with or anything, but it was super easy to use and hardened to a wonderful clear finish.
I wanted a sort of vintage look, and I used a lot of scrapbooking materials in this necklace.  Surely, if you try it, you’ll have a different design in mind, but let me show you how to get started.
What you’ll need:
A deep bezel
Chain
Scrapbook or vintage papers
Mod Podge or craft glue
charms, pearls, stickers, etc.
Jeweler’s grade, low-odor resin and the tools to mix it.  Get the type that dries clear without any UV exposure.  I found mine at Michael’s but I assume most craft stores would have it, that’s just where I happened to be.
First, I trimmed some scrapbook paper to fit the bottom of my bezel.  Then, I used Mod Podge to adhere it to the bottom of the tray.  You want some sort of seal before pouring the resin, otherwise it can soak through the paper.  It still happened a little to mine with just one coat of Mod Podge, so two coats is probably smart.


Next, I added a few embellishments.  The flower stuck up over the edge of the bezel (and thus out of the resin), but I don’t mind at all.  I stuck them in place with a bit of Mod Podge just to be safe, then let it dry for about 15 minutes.


Then, I had to mix my resin.  Just read the packaging instructions very carefully and follow the directions that came with your resin.  Mine just needed to mix equal parts resin with hardener, and stir for several minutes.  I then needed to transfer is to a second container and stir again.  Gloves and protective eyewear are recommended here due to the chemicals, but I will say I didn’t have any trouble with drips, spills, or strange reactions.  I just used one dram of each for one pendant (which you can measure right on your measuring cup).


If you’re using the same stuff as I am, when you stir it, it will be very, very bubbly.  I was skeptical.  But it said that it would de-gas by itself after a few minutes once you pour it.  So, I moved forward.  I just used my popsicle stick to dribble it into the tray.  I thought that worked fine, though a disposable dropper would be ideal here.


If I was skeptical before… I was doubly so now.  It was FILLED with bubbles to the point of looking cloudy.  Turns out – this is okay!


After about five minutes, 95% of the bubbles had vanished.  It mentions in the instructions that gentle heat will pop the remaining bubbles, but you should wait about 20 minutes before attempting it (so that they all have a chance to rise to the surface first).  Now, don’t bust out anything big here – all I did was use a drinking straw, hover it over top of my piece, and gently breathe body-temperature air over the resin.  The bubbles all disappeared instantly.
Then, I set it aside in an out-of-the-way, level place, so that it could dry for 24 hours.  Just be VERY careful not to spill it if you must move it.


The next day, I had a fabulous permanent pendant!  I just needed to add a chain. I cut apart a longer necklace and trimmed it down to 18″, and attached the two ends to my pendant.


What do you think – do you like it?


I can’t wait to try the same technique on a few different styles, not that I know how easy permanent resin is!

The Ten Minute Bracelet


I didn’t invent this design or anything – But I finally made some – there’s hardly even a tutorial involved, they’re such a quick thing – and I will give you some hints for keeping it as simple as possible.
First of all, my focal pieces are links from a chain I picked up somewhere along the line.  I just used a pair of wire cutters to remove a few links.


Think creatively here: you can use anything round, or anything that has two holes.  Anything that you can tie two sets of twine to.  Washers, connecting charms – just raid your box of things-you’ve-been-hanging-onto – you may surprise yourself at what you can find that will work!
Cut six lengths of 18″ (give or take an inch or two) twine.  I have LOTS of hemp leftover from the wish bracelets and word bracelets I made, so that is what I used.  If you’re low on twine you can make this with four strands, but braiding with four strands takes more time than a traditional braid for me, so to keep this *simple* I’m going to tell you to use six.  You could also use embroidery floss here, cotton twine – really, anything you like the looks of!
Take three of your strands, and double them in half, so that you have six loose ends, and three loops in the center.  Take the loops and thread them through your focal ring.


 knot it with your lark’s head knot, and do the same on the other side of your focal ring.  Like so.


Now, separate your strands for your braid.  Remember, you will have six (I fixed that below).  Just divide them up two, two, and two.  I find that clamping it into my clipboard really works the best to secure it while I braid.  And yes, my clipboard does have a giant pink flower on it.


Now, just braid it like normal!  If you have decided to use more or less twine, there are methods to braiding any number of strands out there.  But to keep this fast, I used a traditional braid.  It took me maybe a minute to do each side this way.  Once you get to the end, tie an overhand knot to finish it off.  That’s it.  Super easy!


You could also fancy it up and attach end caps and a clasp, or even a button and loop end.  But with the twine, just tying it like a friendship bracelet really seemed the most appropriate to me.
I found that using about 18″ strands like this made it long enough you could also tie this on an ankle instead, if you like!