Hope you like my Paper, Cotton and Punch-Hole CHRISTMAS CARD. It is best and most beautiful Decoration and activity for pre shcool kids.
Showing posts with label Origami. Show all posts
Saturday, May 28, 2016
Wednesday, May 25, 2016
Friday, May 13, 2016
Origami Talking Dog
The origami talking dog is really easy, and kids love it!
You'll need a marker to draw on the eyes, nose and tongue, so have fun!
Click Here for full Tutorial
Origami Drinking Cup
The origami drinking cup is a traditional and popular design, and if you make it out of grease proof paper, you can actually use it as a real cup!
Click here for full Tutorial
Origami Rose
This beautiful origami rose is the best gift for a loved one! Giving a rose that you have folded yourself is a gesture of pure love and devotion.
Click here for full Tutorial
Origami Heart
The origami heart is such a thoughtful gift for a loved one... Made with special paper and with you own hands, what could be sweeter?
1. Start with your paper white side up.
Fold in half and unfold. Then fold in half the opposite way and unfold.
2. Fold the top and the bottom edges into the centre line
3. Fold the two bottom corners up to the top centre point and unfold
4. Now fold the 2 top corners down to the bottom centre point
and unfold.
5. Fold the outside edges in to the points shown and unfold.
6. Fold all four corners in to the creases just made.
7. Now we are going to form the heart.
Hold the model by the corners, as shown, and bring these corners together.
Click here for full Tutorial
Origami Samurai Hat
The origami samurai hat is a great traditional model that is so simple to make, and wear!
1. Start with paper white side up. Fold in half downwards.
2. Fold outer corners in to the centre.
3. Fold top layer only upwards in half.
4. Fold top layers outwards along creases shown.
5. Fold top layer only upwards along the crease shown.
|
6. Fold same top layer upwards gain.
7. Fold the bottom layer upwards to crease, and open again.
8. Tuck this layer into the inside of hat.
Finished Samurai Hat.
Thursday, May 12, 2016
Origami Frog
Start with a square piece of paper.
Now make a square base.
Next insert your finger in one of the pockets in square base.
Move the pocket around to the front, then flatten and crease it.
This classic origami move is known as the squash fold.
Photo below shows one of the squash folds completed. Now perform the squash fold three times..
..until the piece has the diamond shape shown below.
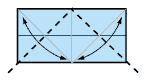
Next fold and unfold the corners as shown, to make crease marks.
Next comes another classic origami move, the petal fold.
The next photo shows the completed petal fold.
Now perform the petal fold three more times (on the other three faces of the diamond), to create the origami frog base.
Fold the frog base down the centerline as shown. Then fold the lower edges
of one layer into the centerline.
Now fold edge A to edge B as shown by the arrow.
The perform the previous three steps again, 3 more times, until the piece looks like below right.
Now it's time to turn the tadpole into a frog!
I like to pre-Crease the leg, then use reverse folds to create the two front
legs.
Now use reverse folds to stretch the back legs.
Apply reverse folds again, twice each on the front and back pairs of legs, as shown in the photos below.
Now you'll need to blow where shown, to inflate the frog's body.
Now your Origami frog is ready. ;)
Subscribe to:
Posts (Atom)